Page 2 of 4 FirstFirst 1234 LastLast
Results 11 to 20 of 38

Thread: RV8 Valley Cover - Tips for Installation

  1. #11
    Join Date
    Jan 1970
    Location
    3960
    Posts
    1,161
    Total Downloaded
    0
    G`day ,

    if you don`t tighten the clamps down until after the manifold bolts are started in their holes the gasket can move into position .

    The clamp bolts can still be got to with the manifold torqued down .

    The slot rather than hole in the right had side of the manifold is a good start point .

    If you only start all the bolts 2 or 3 threads the manifold can be lifted not much though .

    As you found you can put a certain amount of force on the gasket then it buckles .

    If you have the rocker covers still fitted while doing this make sure the manifold is not coming into contact .

    I have some heads that have been machined only on the head face and have had to remove metal from an inlet manifold to get it to sit down in between the heads this required trimming the inlet gasket and matching the ports to the gasket to get it right . main problem is you really only know if you get it right when you next have it apart .

    Forgot to mention you should be able to start the bolts with little effort and only putting them in a little the angle of entry can be compared .

  2. #12
    Join Date
    Jan 1970
    Location
    Canberra
    Posts
    18,616
    Total Downloaded
    0
    Quote Originally Posted by bee utey View Post
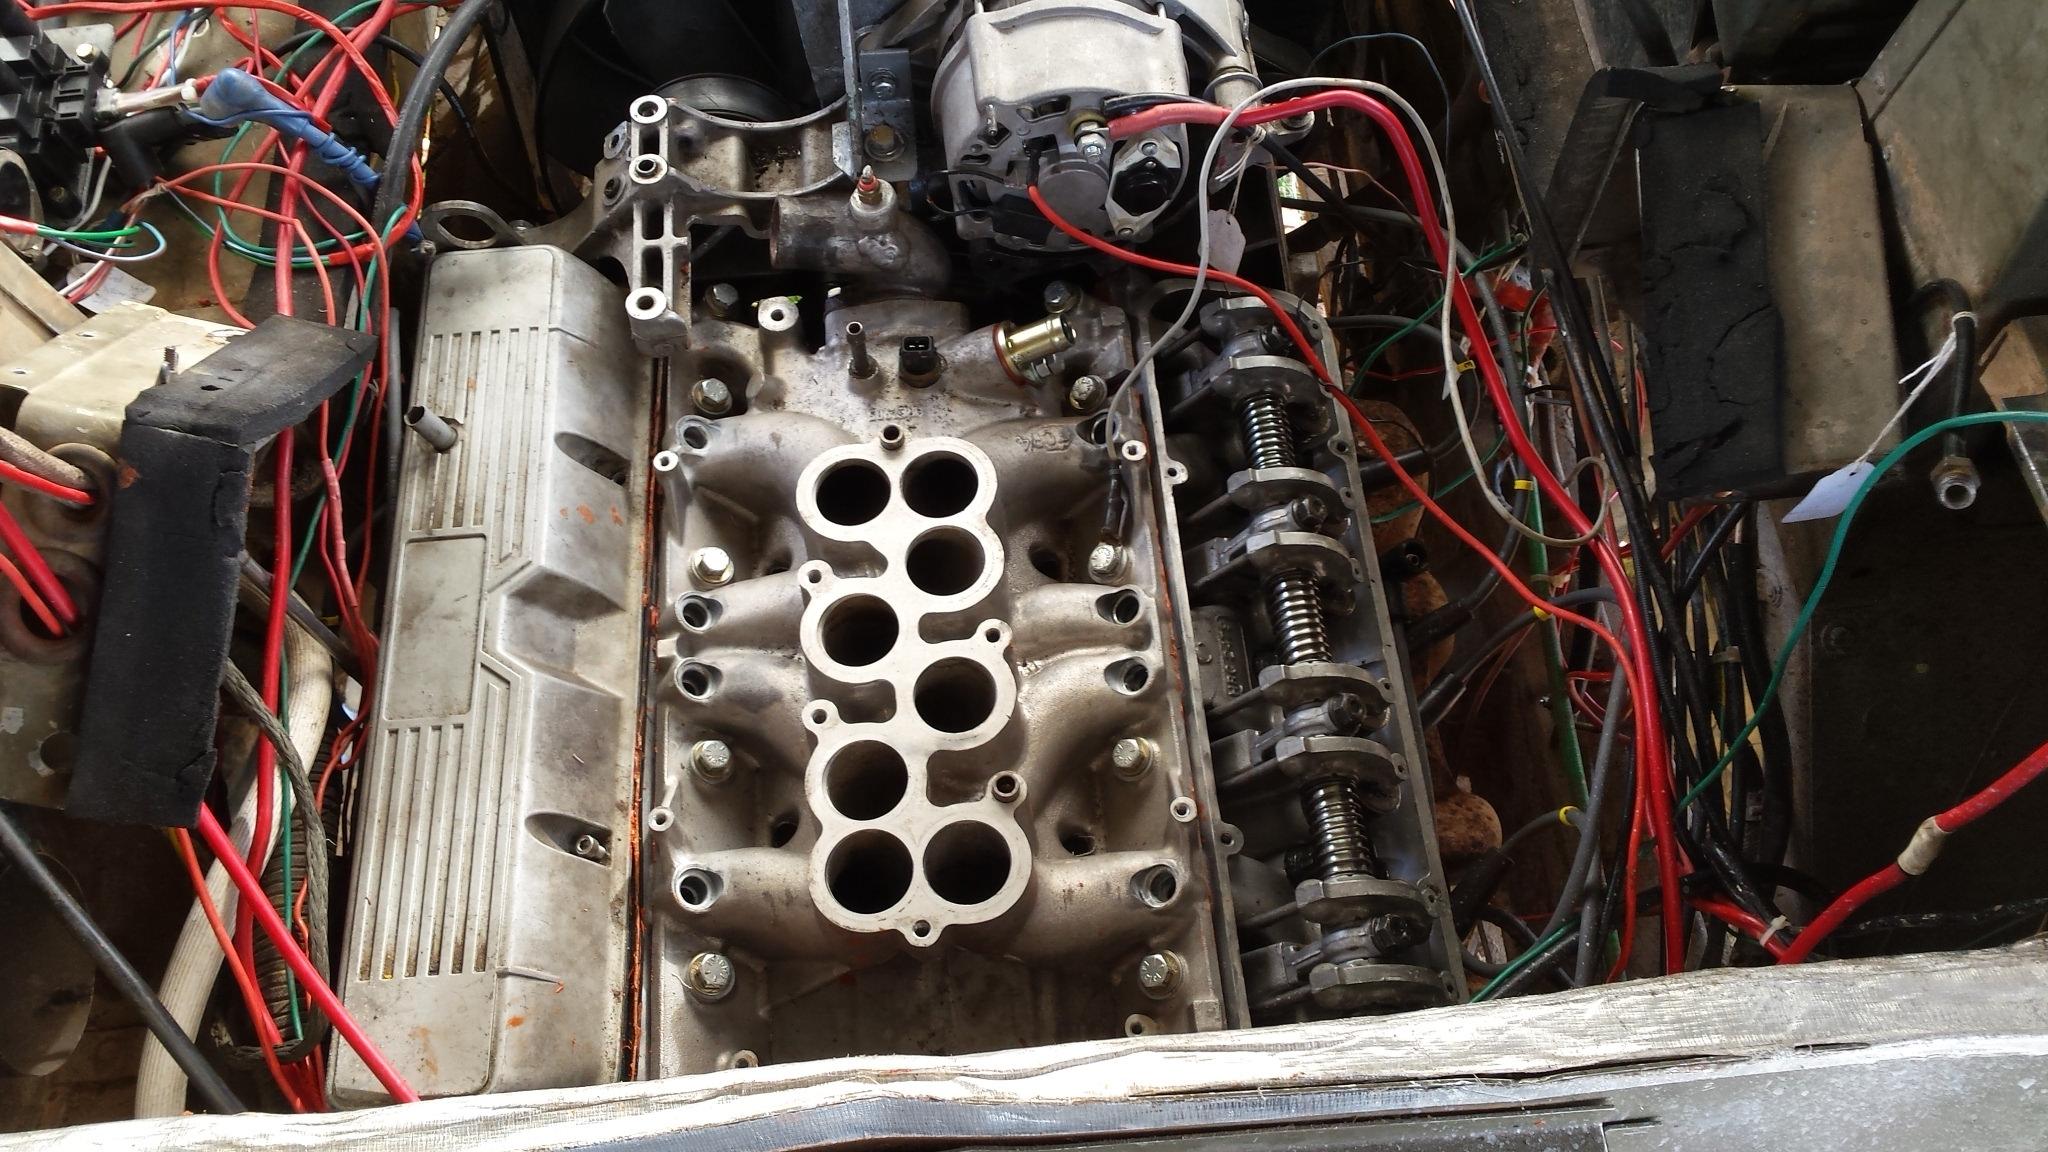
    Later valley gaskets have slotted bolt holes. Your block has been shaved too, I suspect, with the flanged liners. The last time I fitted a tin inlet manifold gasket (happened to be what I had on hand) to a linered block I needed to open up the bolt holes a little with aviation snips. Usually you can check this by bolting down the gasket at each end and hand fitting a manifold bolt to each hole in turn.
    I didn't appreciate later valley gaskets had slotted holes - would help a lot.

    Yes the block has top hat liners and has been given a bit of a dressing - tonight I have elongated the holes in the old gasket and will try again tomorrow.

    Cheers

    garry
    REMLR 243

    2007 Range Rover Sport TDV6
    1977 FC 101
    1976 Jaguar XJ12C
    1973 Haflinger AP700
    1971 Jaguar V12 E-Type Series 3 Roadster
    1957 Series 1 88"
    1957 Series 1 88" Station Wagon

  3. #13
    Join Date
    Jan 1970
    Location
    Canberra
    Posts
    18,616
    Total Downloaded
    0
    Quote Originally Posted by PLR View Post
    G`day ,

    if you don`t tighten the clamps down until after the manifold bolts are started in their holes the gasket can move into position .

    The clamp bolts can still be got to with the manifold torqued down .

    The slot rather than hole in the right had side of the manifold is a good start point .

    If you only start all the bolts 2 or 3 threads the manifold can be lifted not much though .

    As you found you can put a certain amount of force on the gasket then it buckles .

    If you have the rocker covers still fitted while doing this make sure the manifold is not coming into contact .

    I have some heads that have been machined only on the head face and have had to remove metal from an inlet manifold to get it to sit down in between the heads this required trimming the inlet gasket and matching the ports to the gasket to get it right . main problem is you really only know if you get it right when you next have it apart.

    Forgot to mention you should be able to start the bolts with little effort and only putting them in a little the angle of entry can be compared .
    Unfortunately the front clamp cannot be accessed with all the bits and pieces in place at the front of the engine. The rear one can go in place after the manifold is in though.

    I did have to remove the rocker covers as the gasket stops the manifold sitting down correctly. The manifold without the gasket sits perfectly but when the gasket is in place it is difficult to start the bolts at the correct angle - I will try as you suggested to lift the manifold a little and start the bolts on the gasket and then into the heads.

    Thanks for the input - greatly appreciated.

    Garry
    REMLR 243

    2007 Range Rover Sport TDV6
    1977 FC 101
    1976 Jaguar XJ12C
    1973 Haflinger AP700
    1971 Jaguar V12 E-Type Series 3 Roadster
    1957 Series 1 88"
    1957 Series 1 88" Station Wagon

  4. #14
    Join Date
    Jan 1970
    Location
    3960
    Posts
    1,161
    Total Downloaded
    0
    Quote Originally Posted by garrycol View Post
    I didn't appreciate later valley gaskets had slotted holes - would help a lot.

    Yes the block has top hat liners and has been given a bit of a dressing - tonight I have elongated the holes in the old gasket and will try again tomorrow.

    Cheers

    garry
    The later composite gasket do have elongated holes , from what i`ve seen the size varies , in the shed i only have 1 aftermarket and 1 land rover both used the aftermarket elongation is greater than the LR .

    I`d suggest it is not for ease of fitting but for when the thicker composite gasket is compressed to allow some movement .

    The last tin type i used about 4 months ago was to suit a 3.9 EFI with tin head gaskets and there was nothing unusual about the holes .

    I looked at some EFI tin ones i have ( 7 ) and the round holes don`t alter much between no name and made in England ones , i couldn`t locate any carburettor type but have in the past cut the gaskets up to make shims and other things and think that`s where they went .

    Forgot to put , on our Twin CD carbs RR i am able to do a final on both end retainers after the manifold is torqued down , it is actually the one i did 4 months ago , it has a cross bolted 4.0 and 10 bolt heads at present .
    Last edited by PLR; 9th July 2017 at 12:16 AM. Reason: My carb RR

  5. #15
    Roverlord off road spares is offline AT REST
    Major part of the heart and soul of AULRO.com
    Vendor

    Subscriber
    Join Date
    Jul 2012
    Location
    Tecoma Vic
    Posts
    9,642
    Total Downloaded
    0
    Some find after head work the gasket holes are slightly out and a shaved head will slightly decrease the Valley angle. The later composite gaskets are also easier to fit as they are slighlty preshaped.


  6. #16
    Join Date
    Jan 1970
    Location
    3960
    Posts
    1,161
    Total Downloaded
    0
    For my own interest more so than anything as i`ve never looked very closely before , i measured some holes with my Dial Caliper .

    I have found many on this site find it abhorrent to explain with numbers so for them i`ll limit the use of .

    While what i said about the composite gasket holes seem correct to the eye it is not true when measured .

    The difference between the Land Rover and Aftermarket is that the elongation is the same , it is the width of the Aftermarket being narrower which to the eye makes it appear to look taller which it is not .

    The composite aftermarket hole is .3 of a mm wider than a shim steel gasket hole which in turn is .3 of a mm narrower than an aftermarket tin/steel .

    The hole in the aftermarket tin/steel gasket is larger than the hole in the shim steel gasket .

    The aftermarket is not shim steel the factory is shim steel .

    The shim steel and tin/steel gaskets being used give a hole size of a compressed gasket , the hole will be larger in a gasket that has not been used .

    The hole in the shim steel gasket will be smaller after compression because of the material used , it will readily flatten out where the aftermarket will not for the same tension used on the bolts .

    The hole size in the composite type gasket does not alter new or used ( compressed ) because of the materials and makeup .

    As earlier the aftermarket tin/steel are unmarked the shim steel are Corgasyl a Google will show shim steel .

    Forgot to mention that with used gaskets the elongation difference overall is no more than 2.5mm
    Last edited by PLR; 9th July 2017 at 01:41 PM. Reason: elongation

  7. #17
    Join Date
    Jan 1970
    Location
    Avoca Beach
    Posts
    14,152
    Total Downloaded
    0
    I used to have trouble after I milled the heads 40thou then fitted composite gaskets which just about make up the difference.
    Just a tip.
    I found that you have to push down really hard on the manifold when you are first fitting the bolts as well as elongating the holes.
    The 90 degree angle between the heads is greater than the bend in the gasket, so you need to press down really hard to get the gasket to seat right across the inlet ports which brings the holes more into alignment with the bolt holes.

    Sort of like a \___/ rather than a U.

    Regards Philip A

  8. #18
    Join Date
    Jan 1970
    Location
    Canberra
    Posts
    18,616
    Total Downloaded
    0
    Quote Originally Posted by loanrangie View Post
    There should be a couple of tang like bits on either side that hold the gasket in place while you fit the valley clamps.
    While cleaning things up (like removing sealant and running a tap through the holes) I got to thinking why this needs to be so hard and it doesn't if the design of the valley gasket was modified so it could be help in the right spot while the manifold is tightened. Some dowls would work is slotted holes in the manifold that would mean major mods.

    I then thought about your comment "There should be a couple of tang like bits on either side that hold the gasket in place" and I thought why not four tabs spot welded to the bottom side of the gasket, one near each corner. This would be placed in such a position so they catch the underside of the heads so positioning the gasket so it aligns perfectly with the inlet ports and the bolt holes - if the heads have been shaved then the tabs could be bent a little to account for this.

    I was tempted to try it using an old tin gasket and pop riveting some tabs to the gasket but it is too cold and I am too tired.

    Back to what I have to do, I have elogated the holes in the gasket I am going to use and a test fit seems to work OK - the main issue will be to ensure the gasket fits over inlets Ok. Before tightening down I will run my endoscope down each inlet port to ensure the gasket is in the right spot.

    Thanks for all your input - has been great.

    Garry
    REMLR 243

    2007 Range Rover Sport TDV6
    1977 FC 101
    1976 Jaguar XJ12C
    1973 Haflinger AP700
    1971 Jaguar V12 E-Type Series 3 Roadster
    1957 Series 1 88"
    1957 Series 1 88" Station Wagon

  9. #19
    Join Date
    Jan 1970
    Location
    Canberra
    Posts
    18,616
    Total Downloaded
    0
    Well it is on. The elongated holes did the trick but I think I over did it a bit.

    What I did this time - elongated the holes - really no more than about .5mm to 1mm would be enough.

    I sat the tin gasket in place and put in all the bolts about half way in to hold it in place - I then screwed down the two end caps which pulled the gasket down - making sure the gasket was sitting over inlet manifold correctly - happy with the alignment, I then bolted down the end caps tight - with the bolts still in the heads this locates the gasket in the correct place for when the whole lot is screwed in.

    I then removed the bolts - greased them with lithium grease and put the manifold on - I then put in the bolts that would go in easily, but not tightened then up. With the bolts that were difficult a few rubber mallet hits to the top and side of the manifold moved it into the right spot and with all bolts in but not tightened.

    I then put the endoscope down the inlet holes and while the tin gasket was not perfect all was OK. I then tightened all the bolts and put the endoscope down again - all OK but some of the sealant had squished out in the inlet area - while it was still liquid I got a oxy welding wire with some cloth material on the end and poked it down and cleaned out the squished sealant.

    I will not go looking for the washer in the sump at this stage - from experience I know that any sealant (I use the orange stuff so I can see it) that squished out inside the engine will find its way down to the sump and get caught by the oil strainer - it can block this. So when the engine is running again I will keep my eye on the oil pressure until it it time to drop the running in oil - I will then drop the sump looking for the washer and clean out the strainer.

    So all good now - thanks for all your input and advice - greatly appreciated.

    Garry
    Pic from Flickr instead of PhotoBucket
    20170710_120256 by Garry Collins, on Flickr
    REMLR 243

    2007 Range Rover Sport TDV6
    1977 FC 101
    1976 Jaguar XJ12C
    1973 Haflinger AP700
    1971 Jaguar V12 E-Type Series 3 Roadster
    1957 Series 1 88"
    1957 Series 1 88" Station Wagon

  10. #20
    Roverlord off road spares is offline AT REST
    Major part of the heart and soul of AULRO.com
    Vendor

    Subscriber
    Join Date
    Jul 2012
    Location
    Tecoma Vic
    Posts
    9,642
    Total Downloaded
    0
    Quote Originally Posted by garrycol View Post
    Well it is on. The elongated holes did the trick but I think I over did it a bit.

    What I did this time - elongated the holes - really no more than about .5mm to 1mm would be enough.

    I sat the tin gasket in place and put in all the bolts about half way in to hold it in place - I then screwed down the two end caps which pulled the gasket down - making sure the gasket was sitting over inlet manifold correctly - happy with the alignment, I then bolted down the end caps tight - with the bolts still in the heads this locates the gasket in the correct place for when the whole lot is screwed in.

    I then removed the bolts - greased them with lithium grease and put the manifold on - I then put in the bolts that would go in easily, but not tightened then up. With the bolts that were difficult a few rubber mallet hits to the top and side of the manifold moved it into the right spot and with all bolts in but not tightened.

    I then put the endoscope down the inlet holes and while the tin gasket was not perfect all was OK. I then tightened all the bolts and put the endoscope down again - all OK but some of the sealant had squished out in the inlet area - while it was still liquid I got a oxy welding wire with some cloth material on the end and poked it down and cleaned out the squished sealant.

    I will not go looking for the washer in the sump at this stage - from experience I know that any sealant (I use the orange stuff so I can see it) that squished out inside the engine will find its way down to the sump and get caught by the oil strainer - it can block this. So when the engine is running again I will keep my eye on the oil pressure until it it time to drop the running in oil - I will then drop the sump looking for the washer and clean out the strainer.

    So all good now - thanks for all your input and advice - greatly appreciated.

    Garry
    Hope you didn't bolt them down too tight, this is were people have problems with leaks at the valley end seals. Too tight and they will leak soon after .


Page 2 of 4 FirstFirst 1234 LastLast

Tags for this Thread

Bookmarks

Bookmarks

Posting Permissions

  • You may not post new threads
  • You may not post replies
  • You may not post attachments
  • You may not edit your posts
  •  
Search AULRO.com ONLY!
Search All the Web!