

 Reply With Quote
just sand the clear off, use 3200 wet and dry dont go down to the alloy.
depending on how good a job you want and if you have painting experiance, probably best to drop it down to the panell shop. wont cost too much.
cheers phil

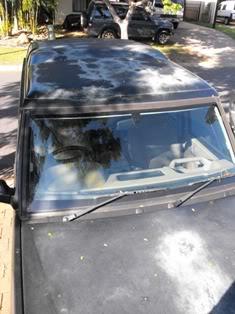
The front roof and bonnet are starting to look milky.
It is the Clear top coat that is the problem and is falling off.
The underlying paint is Willow metallic
If I was to respray it DYI, do I sand back the top coat until I get to the metallic paint, clean and prep it then apply undercoat, then re spray colour followed by Clear coat.
Or does the whole lot need sanding back to the metal, Alloy in the case of the bonnet. Then etch and reprime and paint etc.
( No I don't want a Black bonnet)
or best left to a panel shop. opinions please
 TopicToaster
just sand the clear off, use 3200 wet and dry dont go down to the alloy.
depending on how good a job you want and if you have painting experiance, probably best to drop it down to the panell shop. wont cost too much.
cheers phil
Wizard
hi mate, if the base coat is good and you don't have corrosion between the aluminium and paint from chips you should be able to get away with just sanding back the clear coat, when you re-paint I would be doing a solid colour not a matalic paint with a clear you need to be better than DIY for that kind of job and the paint is expensive. Preperation is the key to a good finish. This is a job I will be doing later in the year on my car.
Master
I'm looking into this exact thing, a friend that is a sprayer said that I needed to sand it back to good paint(or undercoat) and start from scratch. Prime, colour, clear. The bonnet and the roof are the two easiest panels to repaint, however you need to do the top of the guards as well to blend in the job.
I took it down to a decent panel shop up here (my mate lives in Bathurst so he is a bit far away to do the job), they said I wouldn't get much change from 1500 clams. This is about double what my mate seemed to think that the job would be worth. However I am in Darwin and most places are booked out for a min of three months, some up to 12! They kinda charge what they want.
Hope this helps a little.
Last edited by Larns; 23rd April 2009 at 07:50 PM. Reason: Added pic
Mines not as bad as that, the bonnet has a dinner plate size, but crazing of the clear all over and the roof has a half rack so it's the front of the roof that's gone greyOriginally Posted by Larns

Doing a solid colour would involve a full respray
Fossicker
this is not to bad of a job if you go about it in the right way. i would knock it back with 600 wet and dry useing a good rubbing block and plenty of soapey water. remove all of the laquer as this is where the problem is not in the base coat. be carefull not to go through the primer under the base coat or this will need to be etche primed. reprime useing 2k primer then re flat with 1200 wet and dry, apply 2 coats of base coat let dry and nib out any bits that have fallen in with 2000 wet and dry cross hatch 2 more coats of base coat 1.6 nozel air cap. then 3 coats of 2k clear. try to get the first coat on as clean and even as poss try to keep it as dirt and dust free as poss, 2 ltr laquer and ltr base coat should be enough to do the job the front gaurds will need a blow over the top to so keep a bit of basecoat back and a bit of laquer for them to
Admin
There you go simple
Our Land Rover does not leak oil! it just marks its territory.......
 Posting Permissions
| Search AULRO.com ONLY! |
Search All the Web! |
|---|
|
|
|
Bookmarks