


 Reply With Quote
Looks good, Toppa.
How did you bend the curved sections?

 Master
Hi all,
Im another one that didnt want to pay a premium for something I figured I could make for a lot less.
Well other than having very little time to spend manufacturing these due to work and kids, im finally nearing completion. I reckon I started these 4-5 months ago and every now and then I get a 2-3 hours on a saturday to chip away at them.
Now they are by no means perfect and if I were to build another set, i'd certainly do a better job, but im more than happy with the way they have tuned out.
Cost wise (excluding buying a welder for the job.... great excuse for another tool) i reckon its cost me under $300. Of course my labour was free.
Its made from 2mm plate mild steel (id prob up that to 3mm next time, 50 x 2mm pipe and 50 x 3mm box. Id prob use black steam pipe next time as its much stronger.
The hardest part so far was trying to drill the holes through the mounting plates and sill as you dont get a lot of space to run a long drill bit through as the doors get in the way. Im lazy and could have taken them off (doors) but decided it wasnt worth the trouble so it will be held on with 3 bolts under the front door, and 1 bolt under the rear door.
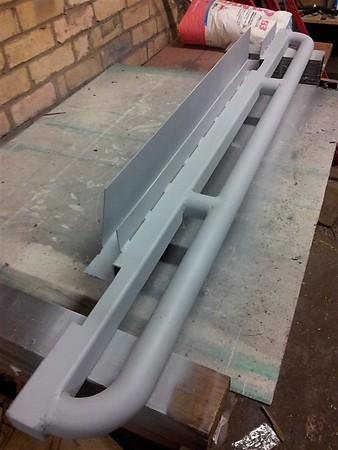
This is the passenger side fully welded except for the verticle mounting plate under the rear door.
Back side showing cut out sections for A and B-Pillars
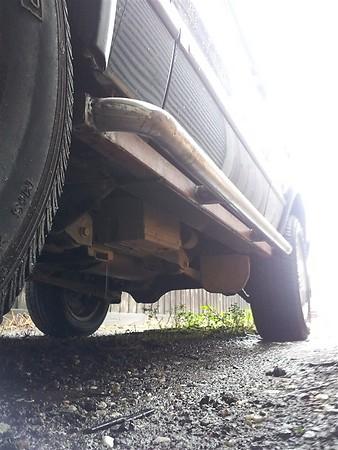
Trial fit, nice and tight. It actually self supported which was nice of it..... would have been hard to get a photo otherwise!
Primed ready for black paint
I must say, my welding has gotten remarkably better during this project. Far from professional, but im happy with it.
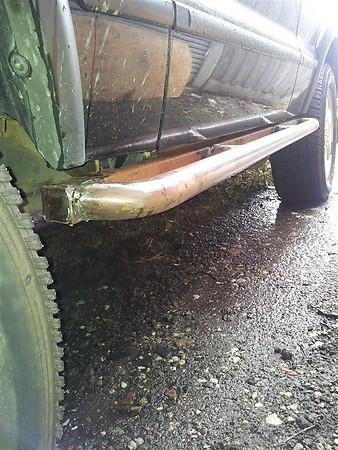
Im not sure id go using a highlift on it but its a damned side better than the plastic that was protecting it before!
Major part of the heart and soul of AULRO.comLooks good, Toppa.
How did you bend the curved sections?
Ron B.
VK2OTC
2003 L322 Range Rover Vogue 4.4 V8 Auto
2007 Yamaha XJR1300
Previous: 1983, 1986 RRC; 1995, 1996 P38A; 1995 Disco1; 1984 V8 County 110; Series IIA
RIP Bucko - Riding on Forever
Master
I didntOriginally Posted by p38arover

, i bought 90 deg elbows, much easier. I then just welded the elbows to a straight section of pipe. If you look closely in the second pic you can see the join marks about 100mm from each end. I ground them back after welding, so fingers crossed that i left enough metal there to hold it all together!
Master
SubscriberGood job mate. I am always impressed by people who do this stuff themselves. Like you say saves money, but also it must be satisfying knowing you did it yourself.
Simon
95 Defender HCPU 130
Master
Thanks Mr Ploppy. It is definitely satisfyingly, but frustrating not having the time to spend on the projects you haves lined up. I've had a winch in the shed for about a year now, so dual batts, mudpod, and rear drawers are now all a little closer having finished the sliders!
Sent from my GT-I9100T using Tapatalk
Master
Nice job Toppa - I might have to come round for some welding lessons (my welding is horrible!
Did you weigh the sliders to see how much weight you added to the vehicle?
Cheers,
Franz
Major part of the heart and soul of AULRO.comGood thinking, Batman!
Ron B.
VK2OTC
2003 L322 Range Rover Vogue 4.4 V8 Auto
2007 Yamaha XJR1300
Previous: 1983, 1986 RRC; 1995, 1996 P38A; 1995 Disco1; 1984 V8 County 110; Series IIA
RIP Bucko - Riding on Forever
Master
I haven't weighed them yet, but but I'm tipping they would be around the 20-25 kg mark each. Pretty heavy but they need to be in order to be a little Rock resistant.
As for the welding lessons, I I think it would be a case of the blindeading leading the bind. Happy to help though.
Sent from my GT-I9100T using Tapatalk
Master
Painted tonight
http://dl.dropbox.com/u/65352124/201...2020.14.59.jpg
Sent from my GT-I9100T using Tapatalk
Master
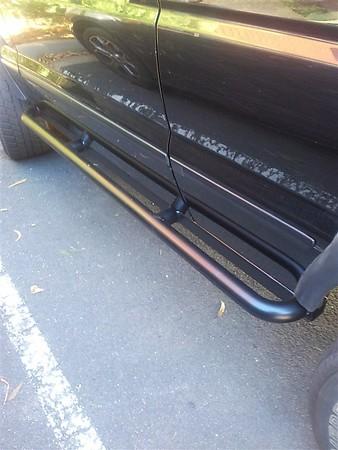
Finally finished both sides. Decided to paint it in a satin black rather than the gloss. Im glad i did as it looks much better.
Now onto the next project.....the mudpod install
The finished product
 Posting Permissions
| Search AULRO.com ONLY! |
Search All the Web! |
|---|
|
|
|

Bookmarks