Page 7 of 10 FirstFirst ... 56789 ... LastLast
Results 61 to 70 of 96

Thread: Bella's new start

  1. #61
    Join Date
    Feb 2011
    Location
    Old Junee
    Posts
    169
    Total Downloaded
    0
    G'day All,

    Thanks everyone for your advice and support about the springs. After reading all the responses and talking to a suspension place, I ended up putting a fine smear of grease between the leaves. I put the grease each side of the center bolt, so that it will work its way along the spring. ( I like the chisel idea Nitemare but with easy access to the springs, I did end up undoing the center bolt a bit and spreading the leaves with a small chisel).

    I'm getting ready to put the axles back on the chassis so I guess I'll be doing some "trampolining" to work the grease.

    Cheers for now,

    Marty.

  2. #62
    Join Date
    Feb 2011
    Location
    Old Junee
    Posts
    169
    Total Downloaded
    0
    G'day All,
    Yet again it seems ages since I've posted anything on Bellas progress, but I promise I'm still working!

    I had a look back through the thread (to jog the memory) and realised that I wanted to show a pic of how I have been moving my chassis.


    So since then, I have put the spring packs and diffs back into the chassis. The diffs and front brakes had already been done when I purchased her, but I had to put I front seal in the front diff as I noticed a bit of a leak when it was sitting on the floor of the shed.

    I'm not really sure of the correct order of restoration, but I wanted to get my firewall sorted out. After fishing around a bit, I found a firewall that, while not great, was a lot better than Bellas. There was one main section on the donor firewall that was badly rusted, but luckily wasn't on Bellas. I cut the sections out and did a swap.


    I had a lot of trouble trying to weld the donor piece back in due to a number of reasons. Firstly, I've never tried to weld anything this thin, and with my skill and my stick welder it just wasn't going to happen.

    A friend lent me his gasless mig, and while the results were far from perfect, I knew I was on the right path.

    I mentioned my woes to the maintenance guy at work (who just happens to be a proper welder) and he set his gas mig up for me to muck about with.

    I got the new piece stuck in and I guess I'm happy with the result.

    I'll post a pic of the repair soon.

    Cheers for now,

    Marty.

  3. #63
    Join Date
    Feb 2011
    Location
    Old Junee
    Posts
    169
    Total Downloaded
    0
    So here's how the repair went.

    The donor piece from the original firewall had a small rust hole that needed to be repaired


    and I borrowed a piece from the other side to get the end of the rib


    Then I managed to get the donor piece put into the "new" firewall


    I've got the engine side of the firewall rust converted and etch primed. I'll get on with the other side shortly so it'll be ready for priming and painting.

    I took a plate( I think it comes from under the seats) with some pretty good original paint on it to the paint shop. They couldn't find a code for the colour but they've done great job matching it anyway and it's in their system as Spanish Olive.

    Hopefully I can get some pics happening soon.

    Cheers,

    Marty.

  4. #64
    Join Date
    Feb 2011
    Location
    Old Junee
    Posts
    169
    Total Downloaded
    0
    G'day All,

    I've been making some progress with Bella so I'll get a few pictures up.

    I wanted to get the firewall painted but I needed some other bits to make the "painting run" a little bit more worth while.

    I managed to dig the seat box and the radiator support panel out of the back shed.

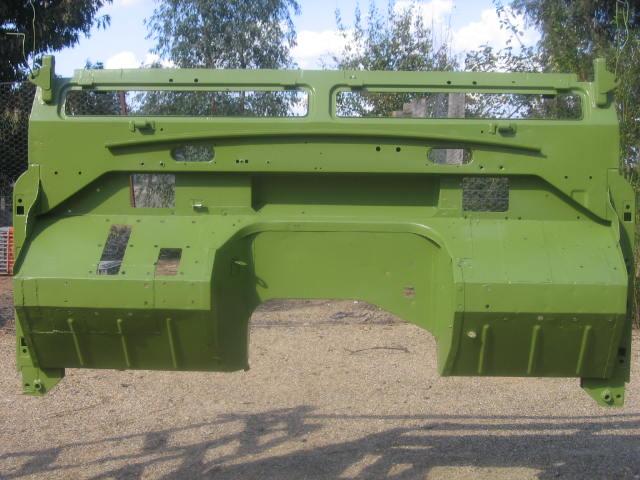
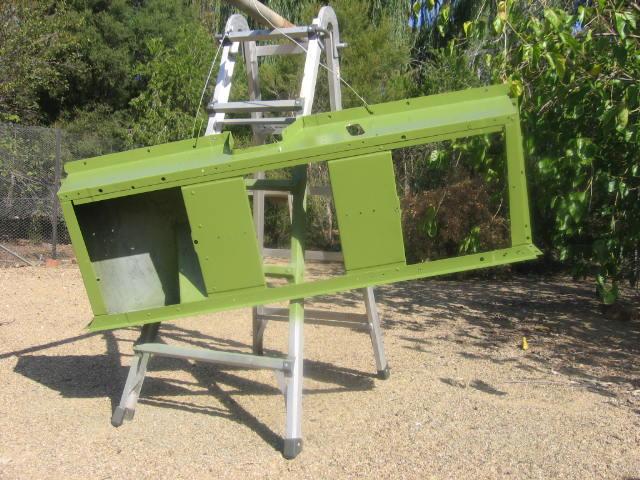
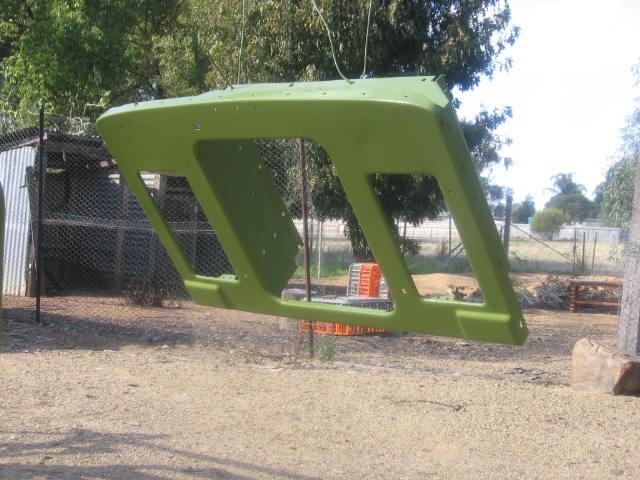
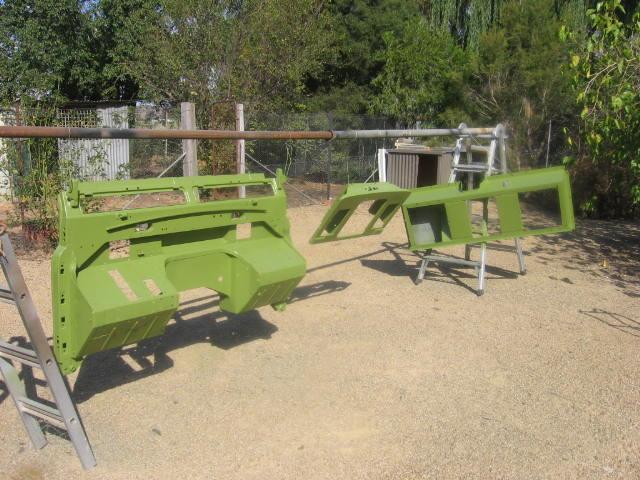
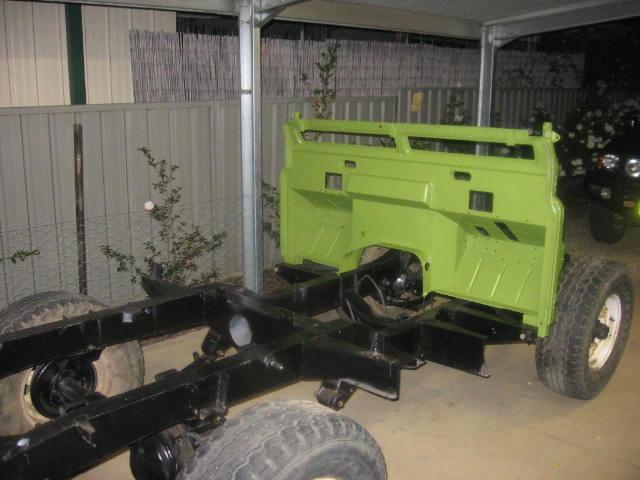
    So the three pieces have had one coat of etch primer, two coats of rust guard primer with a 600 wet sand after each coat and so far, two coats of Spanish Olive rapid enamel with a 1200 wet sand after the first coat. The pieces I'm doing are not high visual exposure pieces so it's a pretty good place to get a bit of practice.

    The firewall


    Seatbox


    Radiator support panel


    Making use of the "rotisserie" again


    As far as the colour match goes, I guess it's the first time I've seen a large area of unfaded paint so it's still growing on me.

    Cheers for now,

    Marty

  5. #65
    Join Date
    Feb 2011
    Location
    Old Junee
    Posts
    169
    Total Downloaded
    0
    G’day All,

    I got the third coat on my bits and pieces after another 1200 wet sand. This time I also added a hardener at 8:1 after talking to the guy at the paint shop. I felt that the enamel wasn’t getting as hard as I wanted.

    I have been using thinners at 20% but the finish has turned out quite orange peely so I think I’ll up my thinners ratio to 30% (the maximum the paint guy said to go) for the next paint run, and see if that improves things. Obviously I’m not after a show car finish, but I’d like it to be a little bit better than what it is. I put the firewall on the chassis as a safe place to keep it.


    Had to laugh... the missus asked me how far I thought I was through the resto, a 1/10th...a 1/12th... I didn’t have the heart to tell her it may never end!

    I’ve been thinking about which direction to take next now that the firewall’s done. I thought I’d get the steering back together and get the brakes hooked back up. From there I thought I’d do the re-wiring. I haven’t ordered my harness yet, but I’m going with Autosparks and I’ve heard they’re pretty quick. After that I’ll do the gearbox, have a look at the engine and throw in a bit more body work. Gee, I’m almost finished!!

    While I was rolling the chassis around I noticed that the drag link (is that the one with the steering damper bracket on it or is that the tie rod?) was fouling on the spring pack clamps that I modified when I turned to the right.


    I have a bit of room to move with trimming the top off the clamp, but if that’s no good I’ll have to bend the clamps over as per original. Has anybody else experienced problems with clearance in this area? I’m a bit worried that I’ve put something together the wrong way.

    That’s about it for this update,

    Cheers for now,

    Marty.

  6. #66
    Join Date
    Sep 2008
    Location
    smurf village
    Posts
    8,332
    Total Downloaded
    0
    looking great!

  7. #67
    Join Date
    Jan 1970
    Location
    under a rock, next to a tree, at Broadmarsh
    Posts
    6,738
    Total Downloaded
    0
    Quote Originally Posted by '76swb View Post


    While I was rolling the chassis around I noticed that the drag link (is that the one with the steering damper bracket on it or is that the tie rod?) was fouling on the spring pack clamps that I modified when I turned to the right.


    I have a bit of room to move with trimming the top off the clamp, but if that’s no good I’ll have to bend the clamps over as per original. Has anybody else experienced problems with clearance in this area? I’m a bit worried that I’ve put something together the wrong way.


    Hi Marty

    Most of those clamps are just folded over and with more weight on the springs, the steering should then clear.
    Watch for rubbing when the axle articulates.
    .

  8. #68
    Timj is offline Wizard Silver Subscriber
    Join Date
    Feb 2008
    Location
    Brisbane,Qld.
    Posts
    1,194
    Total Downloaded
    0
    Hi Marty,

    I had exactly the same problem with aftermarket springs and the clamps. I took the bolt out, heated up the sides and bent them over. Only had to do it on that one clamp, second from the front.

    TimJ.
    Snowy - 2010 Range Rover Vogue
    Clancy - 1978 Series III SWB Game.
    Henry - 1976 S3 Trayback Ute with 186 Holden
    Gumnut - 1953 Series I 80"
    Poverty - 1958 Series I 88"
    Barney - 1979 S3 GS ex ADF with 300tdi
    Arnie - 1975 710M Pinzgauer

  9. #69
    Join Date
    Feb 2011
    Location
    Old Junee
    Posts
    169
    Total Downloaded
    0
    Thanks guys, looks like it's out with the oxy!

  10. #70
    Join Date
    Feb 2011
    Location
    Old Junee
    Posts
    169
    Total Downloaded
    0
    G'day All,

    I got the spring clamps bent over with the springs still in place. I used a mates burner that attaches to one of those butane cans. I wasn't sure if it was going to be hot enough, but it did the job quite easily.


    I did the initial bend with a shifter and finished it off with a clamp.


    I now have a lot more clearance at the drag link even though there is a bit of a gap between the clamp and the spring.

    I also stripped down the brake and clutch pedal brakets and noticed a bit of cancer under the master cylinder on the brake bracket.


    I had a look at the two pedal brackets that came on the donor firewall and while they are in better nick, there are some subtle differences in the shape. I managed to weld in a small plate under the main hole and patch a couple of holes in the sides.


    Both the donor brackets are the same shape as the original clutch bracket, but they all have a slightly different master cylinder setup. I guess they can be added to the beg, borrow, steal pile for when the resto is finished.

    Cheers for now,

    Marty.

Page 7 of 10 FirstFirst ... 56789 ... LastLast

Bookmarks

Bookmarks

Posting Permissions

  • You may not post new threads
  • You may not post replies
  • You may not post attachments
  • You may not edit your posts
  •  
Search AULRO.com ONLY!
Search All the Web!