

 Reply With Quote
Is this something that is only used with the original jack? I just use a trolly jack under the plate where the leaf spring and axle bolt togetherOriginally Posted by 67hardtop


 ChatterBox
That bracket is the jacking point and is fitted to the botton of the drivers side swivel hub only. Im missing mine. I cant find it anywhere...grrr.
As far as I know the extractors should fit. I bought a new set, just gotta get them ceramic coated to reduce heat transfer to the cabin area
Cheers Rod
Sent from my GT-P5110 using AULRO mobile app
Master
SupporterIs this something that is only used with the original jack? I just use a trolly jack under the plate where the leaf spring and axle bolt together
ChatterBox
Yes i think so.
Cheers Rod
Sent from my GT-P5110 using AULRO mobile app
Lord Jock
That bracket goes on the bottom of the right hand side swivel housing.
It stops the chrome ball getting damaged by the jack when locating the jack and/or jacking the vehicle up. There is not one on the left as there is a bit more room for jacking points with the longer axle tube/diff housing.
Most of the time these brackets get tossed as people don't know what they are for or where exactly they were removed from.
Cheers, Mick.
1974 S3 88 Holden 186.
1971 S2A 88
1971 S2A 109 6 cyl. tray back.
1964 S2A 88 "Starfire Four" engine!
1972 S3 88 x 2
1959 S2 88 ARN 111-014
1959 S2 88 ARN 111-556
1988 Perentie 110 FFR ARN 48-728 steering now KLR PAS!
REMLR 88
1969 BSA Bantam B175
ChatterBox
Hey mick do u have a spare one lying around u dont need?
Cheers Rod
Sent from my GT-I9507 using AULRO mobile app
Lord Jock
I will have a look tomorrow Rod.
Cheers, Mick.
1974 S3 88 Holden 186.
1971 S2A 88
1971 S2A 109 6 cyl. tray back.
1964 S2A 88 "Starfire Four" engine!
1972 S3 88 x 2
1959 S2 88 ARN 111-014
1959 S2 88 ARN 111-556
1988 Perentie 110 FFR ARN 48-728 steering now KLR PAS!
REMLR 88
1969 BSA Bantam B175
Master
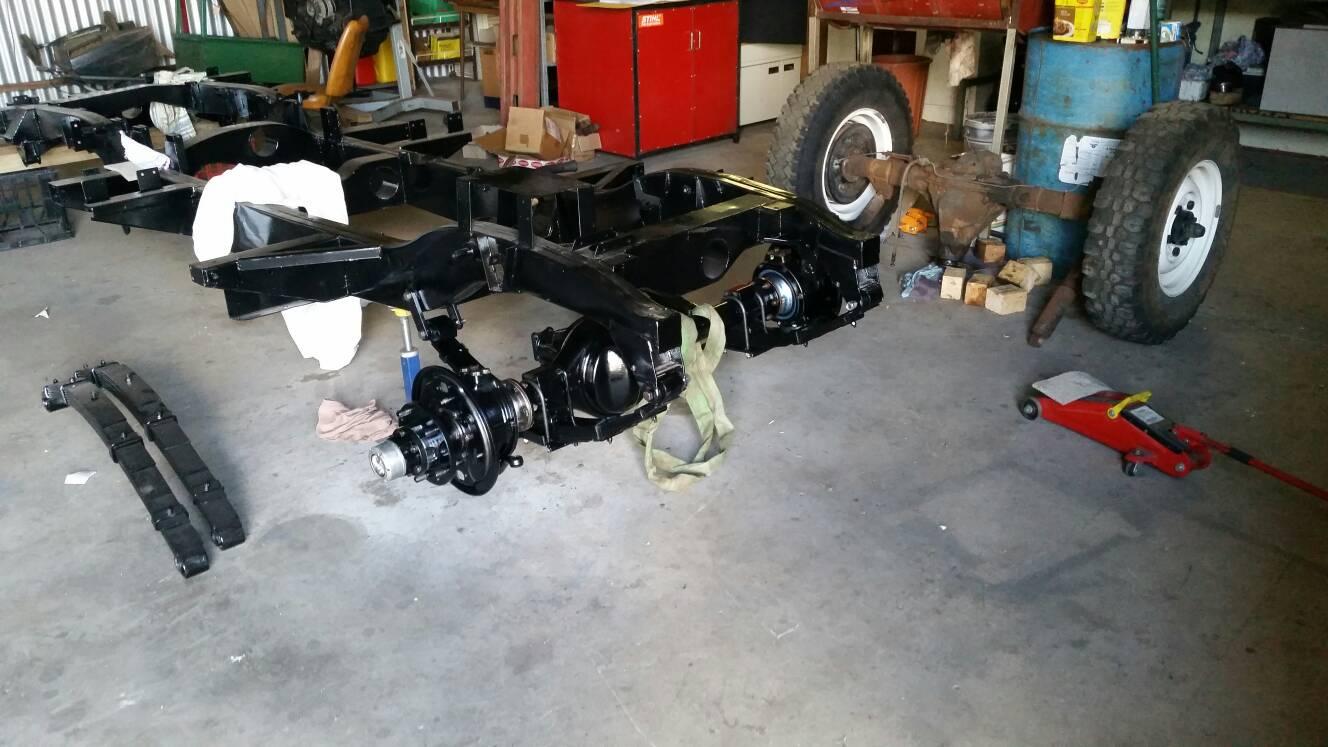
SupporterThis afternoon I fitted the front axle & springs to the chassis. It's nice to be working with new/clean parts. I was hoping to fit the new shocks but they don't fit by about 1cm. I will need to wait until I fit the engine to compress the springs down a bit more.
After tea I decided to have a crack at the steering relay. It got hit with the wire wheel to clean the outside up then I proceeded to strip it down as per the manual. I was a bit disappointed as I didn't get the big bang of the spring exploding. I replaced the oil seals and managed to reassemble it without loosing an eye. Gave it a quick coat of paint and it should be ready to install. Should I put some grease between the relay and chassis housing? Or just leave it dry.
Next job is to start the rear sailsbury diff
Lord Jock
Ben , a while back I removed a relay that had been wrapped in Denso tape and it just lifted out of the chassis with ease.
Graphite grease or Copper Kote would do a good job too!
Cheers, Mick.
1974 S3 88 Holden 186.
1971 S2A 88
1971 S2A 109 6 cyl. tray back.
1964 S2A 88 "Starfire Four" engine!
1972 S3 88 x 2
1959 S2 88 ARN 111-014
1959 S2 88 ARN 111-556
1988 Perentie 110 FFR ARN 48-728 steering now KLR PAS!
REMLR 88
1969 BSA Bantam B175
Master
Supportertonight i finished cleaning up the rear Salisbury diff/axle and replaced the rear cover gasket and replaced the pinion seal before giving it a coat of primer. not real easy to to work with as you cant remove the diff center on the Salisbury units compared to the rover type.
I made sure i marked the nut, hub & pinion shaft before removing it, hoping i managed to keep the preload on the pinion hub the same when reassembling. One thing i forgot to do was install the new gasket that goes in behind the new pinion seal. I had it there on the bench but somehow managed to forget it. How important is this gasket? I suspect that if i try to remove the new seal its going to damage it. I may add another pinion gasket to my next order of bits & pieces.
Master
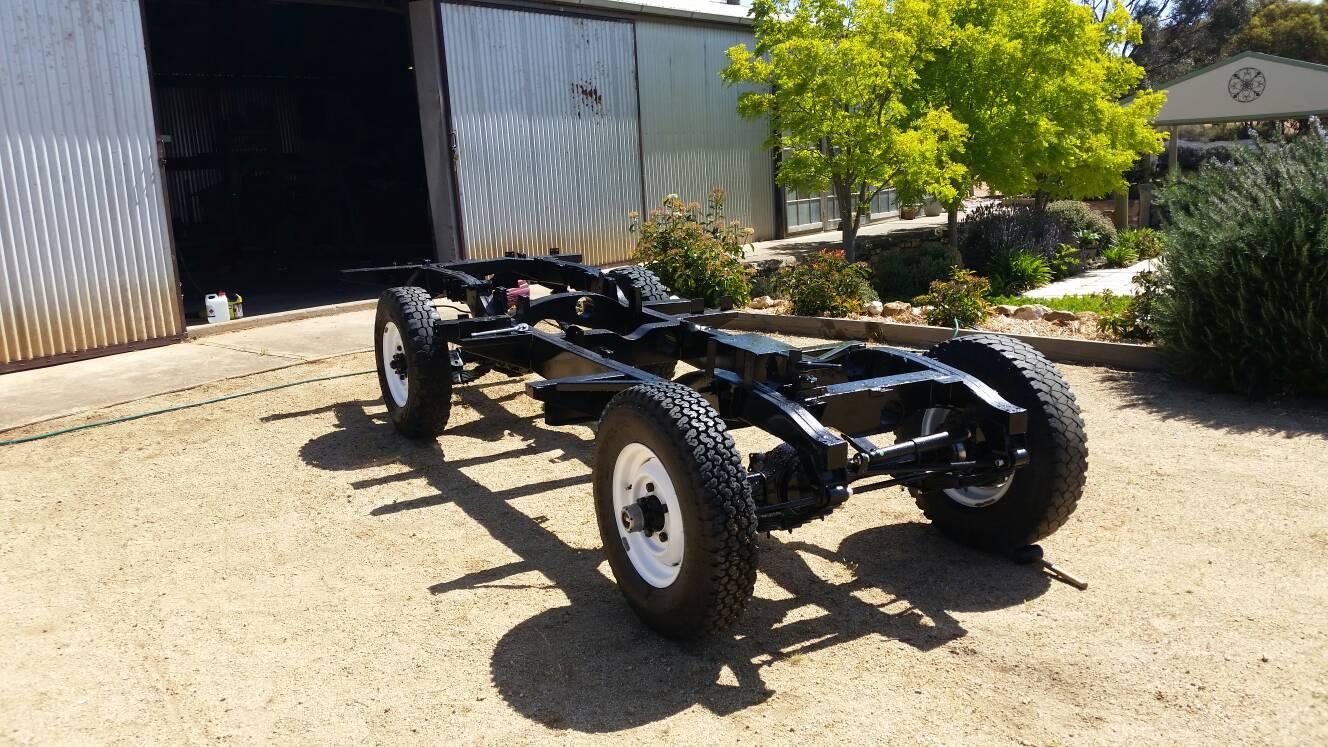
SupporterFitted the rear axle and springs today. Fitted the wheels and pushed it out the shed - we're rolling
Spend the rest of the arvo cleaning up the huge mess in the shed and rolled it back in.
Now to start on the engine
 Posting Permissions
| Search AULRO.com ONLY! |
Search All the Web! |
|---|
|
|
|
Bookmarks