Page 1 of 2 12 LastLast
Results 1 to 10 of 13

Thread: Changing tyres

  1. #1
    Join Date
    Aug 2006
    Location
    Brisbane
    Posts
    743
    Total Downloaded
    0

    Changing tyres

    Hi all,

    I was just after some tips on removing and replacing tyres on a rim (tubeless & tubed). I have replaced tyres on much smaller rims like ride on mowers, but have not had any luck attempting larger ones. So dose anyone have any tips or tricks? I figure this would be a fairly importaint skill to know, particularly when in remote areas.

    Cheers Paul

  2. #2
    Join Date
    Aug 2006
    Location
    WA
    Posts
    13,786
    Total Downloaded
    0
    The thing I find most difficult is breaking the bead if it hasn't happened already. I usually put the tyre on the ground just forward of the RH front wheel, and carefully drive onto the tyre (not the rim) in low range. This usually works, and if not, I usually park on top and use a hi-lift jack on the other side, which gets even the most stubborn IME.

    The rest is just brute force, and detergent helps when seating the bead.

    Having extra hands also helps :


    EDIT - also - bolting it on the spare wheel carrier to remove and refit the tyre (once the bead is popped on both sides), made life a lot easier and stopped dirt getting inside.

  3. #3
    Join Date
    Jul 2006
    Location
    Tumbi Umbi, Central Coast, NSW
    Posts
    5,768
    Total Downloaded
    0
    I also often find that breaking the bead is hardest part of the job.
    The only tools I have for the job are a couple of tyre levers.
    A fellow camper at Fitzroy crossing some years ago saw me unsuccessfully trying to break the bead using the "drive onto the tyre in low range method".
    He offered me the use of a tool he said he had been using for years on truck tyres and I have to say it was the easiest way I have come across for breaking the bead.

    It was just a bit of flat steel about 400-450mm long about 35mm wide and about 6-8mm thick. It had a ledge about a third of the way up that stuck out about 30mm.
    I can't remember whether the ledge was welded and gusseted or whether it was formed by bending the steel.
    The idea was very simple.
    Put the bottom on the tyre close to the rim and belt the living daylights out of it by hitting the ledge with the biggest hammer you can lay your hands on.
    It worked a treat.
    Probably some of the specialised tools work just as well, but this was something you could easily make out of a bit of scrap steel.
    I can't imaging why I haven't made one of my own yet.

    1973 Series III LWB 1983 - 2006
    1998 300 Tdi Defender Trayback 2006 - often fitted with a Trayon slide-on camper.

  4. #4
    Join Date
    Jan 1970
    Location
    Sydney
    Posts
    1,681
    Total Downloaded
    0
    snip
    Quote Originally Posted by isuzurover View Post
    . I usually put the tyre on the ground just forward of the RH front wheel, and carefully drive onto the tyre (not the rim) in low range. This usually works, and if not, I usually park on top and use a hi-lift jack on the other side, which gets even the most stubborn IME.
    Gotta be careful with this drive on the tyre trick. OK with the old crossplies, but you can damage radial belts by crushing them like this.

    I've never had much luck with a hi-lift, the bullbar goes up but the beat doesn't to seem to go down..

    Only tip I'd give is practice on a wheel at home. If you can't do it there, forget trying in the bush.

    One more: If a tyre has rolled off the rim with low pressures, usually the inside bead is intact. You can usually set the compressor going, then "pull" the outside bead into position. You'll hear any leaks & adjust. It'll pop on. Obviuosly clean the bead & wheel of any sand & grit first.

    Regards
    Max P

  5. #5
    Join Date
    Jan 1970
    Location
    Nanny state UK...
    Posts
    3,253
    Total Downloaded
    0
    I use the Hi-Lift method of bead breaking but I've got a little tip for getting the new bead seated...

    If the tyre isn't sealing against the rim enough for you to start pumping air in, run a ratchet strap around the outside of the tread. When compressed in the middle, the bead should be forced out enough to make that initial seal to let you pump.

    As for keeping it clean, I tend to try & do the change on a tarp...

    HTH

    M

  6. #6
    Join Date
    Jan 1970
    Location
    Somewhere else, QLD
    Posts
    1,863
    Total Downloaded
    0
    Even though I don't get to use it often, I find this

    products

    is pretty easy to pull tyres on and off. Even if you don't get the beadbreaker, invest in a set of tyre levers - visit Gasweld or similar and get the proper 'Mumme' brand, as you'll be exerting some force on them and you don't want them to bend. The other thing to carry is Dishwashing liquid: Mixed with water and applied to the bead before and during removal, and during fitting makes life heaps easier. Once you have tyre levers, practising on a a few tyres helps. Once you have the method down, you never forget, and you can do it by yourself with minimal effort.

  7. #7
    Join Date
    Jan 1970
    Location
    Normanhurst, NSW
    Posts
    10,258
    Total Downloaded
    0
    Basically there are three types of bead breakers commercially available and having experienced all three and especially where Land Rover alloy rims are concerned, the Tyre Jaws are the only ones worth considering.
    The LR alloys have a very large safety bead that you must get the bead of the tyre over. IMHO the Tyre Jaws are the most universal and easiest to use.

    Tyre Pliers


    Very quick to use. better suited for use on steel rims with tubed tyres - rims from 10" to 16" diameter. Operates on a lever principal and require much repositioning as you work your way around the rim.

    Tyre Jaws - Slower to use, but requires very little physical effort. Is suitable for all rims from 10" to 18" diameter. Especially good for alloy rims, as the design limits the chance of marking or scratching the rim. Operates on screw-thread action. See Photo below.

    B&B Bead Breaker - Suitable for use on any rim type & size, but may mark alloy rims. Operates on a combination of clamp/screw design. Fiddley to set up but once done is reasonably quick & easy to use. Ideal for use where a large variety of tyre sizes & tyres will be used (ie Trucks & Tractors).

    As far as refitting the tyre to the rim, I never use tyre levers as they will damage the tyre bead and lead to possible sealing problems. The secret is in the positioning of the tyre to require the least 'stretch' of the bead. It's usually pretty easy to get half the tyre onto the rim and once this is done, it is positioned in the well of the rim. Then with the use of some detergent (or sometimes just water) around the bead and a large rubber mallett the tyre can be belted (no pun intended) onto the rim without damage. This does require some practise but by standing on the tyre and varying the angle of impact you will soon get the idea.
    Attached Images Attached Images
    Roger


  8. #8
    Join Date
    Aug 2006
    Location
    Melbourn(ish)
    Posts
    26,495
    Total Downloaded
    0
    your welcom to come out to my place and I'll help you out with tyres 101 Ive got 4 tubed tyres on my trailer Im looking at changing and while I have a bunch of guys over swinging on tyre levers I was going to change the wheel bearings too.

    tyre plier kits are you best friends when it comes to tyres.
    Dave

    "In a Landrover the other vehicle is your crumple zone."

    For spelling call Rogets, for mechanicing call me.

    Fozzy, 2.25D SIII Ex DCA Ute
    Tdi autoManual d1 (gave it to the Mupion)
    Archaeoptersix 1990 6x6 dual cab(This things staying)


    If you've benefited from one or more of my posts please remember, your taxes paid for my skill sets, I'm just trying to make sure you get your monies worth.
    If you think you're in front on the deal, pay it forwards.

  9. #9
    Join Date
    Aug 2006
    Location
    Brisbane
    Posts
    743
    Total Downloaded
    0
    Thanks for the replies guys, i will have to muck around with the old wheels off the series 3 I'm guessing the old 7.50 16's are a bit of a pain to work with, they are not very pliable.

    Blknight.aus, i might take u up on the offer. I would be happy to help change a few tyres in exchange for a bit of knowledge. I have a 5th tyre that i need to fit to a rim, as i do not wish to use a 33x12.5 wrangler as a spare for very long when i am running SteelTreks

  10. #10
    numpty's Avatar
    numpty is offline TopicToaster Silver Subscriber
    Join Date
    Jan 1970
    Location
    Nundle
    Posts
    4,077
    Total Downloaded
    0
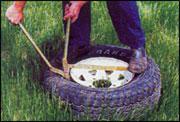
    Like others, I have an R & R Beadbreaker, and have found it very good. The first tyres I practiced on were an old set of crossplies on my S1 rims. These tyres had been on the rims for over 20 years and were "welded on". Took some doing, but got them all off, and have done quite a few more since.

    I too, have had little joy with driving over the tyre, or with the hi lift jack methods of breaking beads. You will need to practice, practice, practice, and still you will find that some people are just better at some things than others.
    Numpty

    Thomas - 1955 Series 1 107" Truck Cab
    Leon - 1957 Series 1 88" Soft Top
    Lewis - 1963 Series 11A ex Mil Gunbuggy
    Teddy5 - 2001 Ex Telstra Big Cab Td5
    ​Betsy - 1963 Series 11A ex Mil GS
    REMLR No 143

Page 1 of 2 12 LastLast

Bookmarks

Bookmarks

Posting Permissions

  • You may not post new threads
  • You may not post replies
  • You may not post attachments
  • You may not edit your posts
  •  
Search AULRO.com ONLY!
Search All the Web!