


 Reply With Quote
With a blower or 300 worked headsOriginally Posted by justinc


 Swaggie
Yup, especially since it has just had a cam etc, by the time the cam wears out a 4.6 long is going in...
JC
The Isuzu 110. Solid and as dependable as a rock, coming soon with auto box😊
The Range Rover L322 4.4.TTDV8 ....probably won't bother with the remap..😈
With a blower or 300 worked heads
YarnMaster
SubscriberThanks JC , if I want slightly more compression I need to go with Tin gasket after shimming heads slightly ? I've already ordered the composite ones ?I'll try and find a place that reco's heads and take them both there , you spoke about matching ports ? I know Bruce Davies does this in-house but how Can I achieve the port macthing seeing I'm a total Novice at this , also some of the valves are badly work out , would it pay to put in a new set exhaust and intake valves ? which would mean some head work ? I know Tony mentioned to pout some dieso into the port to see if the valves leak ? I would like to get the Job Done right seeing I've gone thru all the trouble of pulling both heads off..
That's not a problem at all mate.Glad I can help.
Thanks...If there were more poeple like we have here the world would be a nicer place for shure
Unless you have a halteck or unichip etc I think the in house job won't make a lot of diffo. They do make them breath a bit better by removing a bit near the valves but not sure if thay port match the manifold + gasket. I recon a bit of miss match can increase low end torque to some extent anyway.
Do you have one of these http://www.carbidebur.com/misc/airto...FQhJagod5QmcDg
If so you can match ports and gasket. Just assemble with some blue muck and then disassembly soon after will reveal what needs to lose weight
YarnMaster
Subscriber
Noooooooooooooooooooooo , I don't want to see the Colour Blue any more
That Grinder looks like it will do the Job , problem is I wouldn't know which parts to grind off to port match , it looks like a simple enough job , may be I'll take the intake and heads to BD and get him to set it up properly
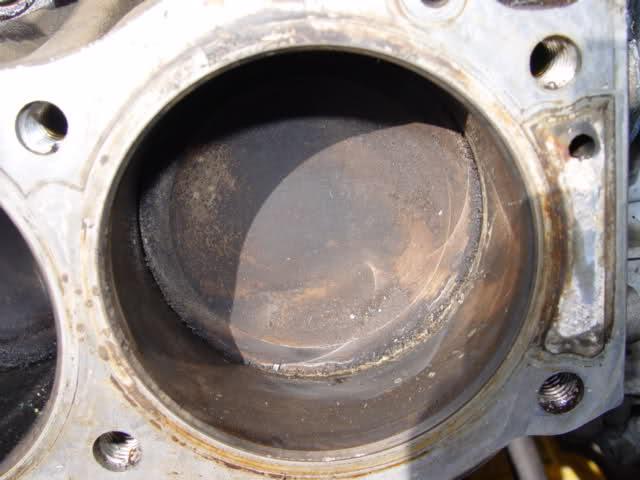
That's a lot of crud stuck between the piston & bore from when you scrapped the block clean
Get a old vacuum cleaner ... and vacuum out as much of the crud as possible ... before you turn the crank
Then rotate the motor crank so that when each piston is at the top .. you vacuum clean out the crud in the gap between piston & the bore
Don't try to give it a blast of compressed air to clean it .. as you want to remove as much debris as possible right now
Also put a light coating of oil on the bores ... when you are finished cleaning .. so rust doesn't form
Also ... Did you protect & cover the oil galleries (when cleaning) from debris falling in?
Also put a big rag over the whole exposed block to protect from unwanted objects such as moths / dust / etc falling in and giving grief later on
Mike
Swaggie
SubscriberCongratulations Khos! I knew you could do it!
You can see the water track on that end cylinder.Dunno which number but whichever it has been leaking compression there.
I agree the motor looks fine and if you trust that a new cam is in, then just get the heads serviced and then you have the joy of putting it back together.
IMHO the cam is OK as there was no noise when I drove it. It is quieter than mine! which I guess is logical since mine has done 162KK on the original cam.
Clean off the top of the block with scotchbrite pads, while having some rag in the cylinders, and make sure all the stud holes are clean and dry before reassembly. Clean the threads with a dental pick if necessary. And then maybe wind a screwdriver down the holes with a bit of rag wrapped around it.
BTW that is a 14 stud head. The outer studs must not have been refitted last time . See the outer row of holes. The outer studs are not necessary but that makes it a tin gasket head.
Now THAT is what I call loctited!!!! That is crazy stuff. You also see why you shouldn't use the stuff if you want to get the engine apart again.
Regard sPhilip A
Doesn't work that way .... You have to port match manifold to heads on & with the block
Would be best to assemble 1st so can see what is offset etc the manifold and heads off the block wont doWho ever put it togeather last time must think they leak oil
X2 thanks Mike. Very important for longevity. Don't clean the carbon off the pistons as will lower the compression
YarnMaster
SubscriberMike , the debris you see inside the bores is not from cleaning the heads , it's actually when the heads where in place , I was being silly enough to use compressed air inside Rocker cover and all that debris has fallen inside the boresand also when I finally managed to pull of the intake manifolds off some more dirt fell inside the bores , yeah I know "I wasn't finking"
I'll get a Vacum cleaner tomorow morning and try and get as much debris out of the bores as possible
Thanks Phillip , I know the blue sealant was used quite excessively , it took a lot of knocking to break the bond , but I finally managed to get the intake mannifold and the Head of the drivers side, but the head on the passenger side is still held to the Bottom end with 1 single Bolts which is unaccessable and it's right behind that p/s Bracket which needs to be removed with alen key
 Posting Permissions
| Search AULRO.com ONLY! |
Search All the Web! |
|---|
|
|
|
Bookmarks