Page 5 of 23 FirstFirst ... 3456715 ... LastLast
Results 41 to 50 of 226

Thread: Expedition Home-build - AU to IE

  1. #41
    Join Date
    Aug 2006
    Location
    Kingston, Tassie, OZ.
    Posts
    13,728
    Total Downloaded
    0
    Mike,

    you will still have to adjust valve clearances as these will change due to crush of the new head gasket, and especially if the head gets a skim. You can use the no hole one if you like, it'll run fine, but better to replace with what came off.
    Great job and tutorials like this are invaluable! Top stuff

    JC
    The Isuzu 110. Solid and as dependable as a rock, coming soon with auto box😊
    The Range Rover L322 4.4.TTDV8 ....probably won't bother with the remap..😈

  2. #42
    Join Date
    Jan 2009
    Location
    On the road around Australia
    Posts
    900
    Total Downloaded
    0
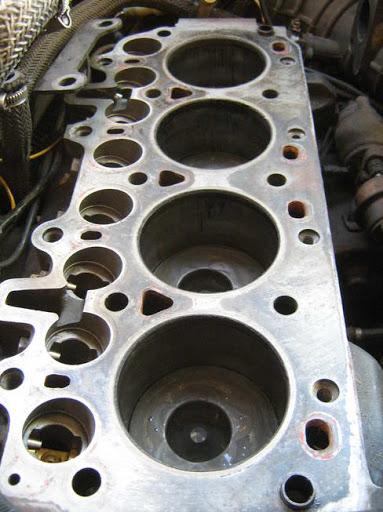
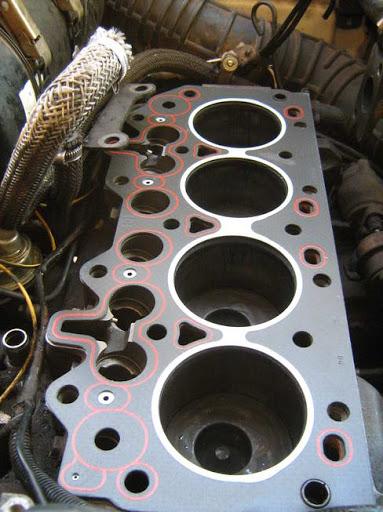
    As I said, hopefully someone will benefit from it - I certainly have from other peoples posts over the years. And don't thank me yet - I still have to put the new gasket on and get her running again

    Seeing as this thread is turning into a series of tutorials, I might repost them later on down the line as individual threads, seeing as this is a "Tutorials" forum. Assuming of course, the moderators don't have a problem with it??

  3. #43
    Join Date
    Jan 2009
    Location
    On the road around Australia
    Posts
    900
    Total Downloaded
    0
    CHANGING THE HEAD GASKET - CONTINUED

    Well it’s no good having the head ten feet away from the rest of the engine, so now it’s time to reassemble the whole lot into a working engine. This will be the last chance you get to clean the mating surfaces, so do it well; I used an airgun to clear any debris out of the cylinders and the bolt holes in the block, and wiped down the block with petrol to remove any grease.
    Next, rotate the crankshaft pulley in a clockwise direction until the pistons are all half-way up the cylinders.


    Ensure that the two locating dowels are fitted in the cylinder block. If yours, like mine, are stuck in the head, pull them out with a pliers and gently tap them into the block.


    Using the locating dowels as a guide, fit the gasket to the block, making sure that the top is facing up. Considering its shape, it’s fairly obvious if you have it fitted incorrectly


    Once everything is in place, lift the head onto the block, again using the locating dowels to match up the faces of the block and the head. When the head is in the right location, the dowels should lock into place.


    Now it’s time for the head bolts. Depending on who you talk to, you can reuse the head bolts up to five times, or you can’t reuse them at all. Seeing as I’ll be driving in some remote locations, I opted to replace mine. However, if if it were just my daily driver, I’d probably reuse the old ones if they looked to be in decent condition.
    Either way, there are 18 bolts, and they come in three sizes - 140mm M12’s, 100mm M12’s, and 117mm M10’s. If you’re buying a new set, make sure that you have the lot.


    Clean the head bolts with a wire brush and lightly oil them. Now fit the cylinder head bolts of the correct length in each location around the block, making sure not to drop the bolts into the cylinder and damaging the thread. Then tighten bolts until bolt heads just contact the cylinder head.

    NB. Bolts 6 and 14 are also used to hold the bracket for the air filter in place – make sure that you fit the bolts through this too – unlike me, who had to go loosening the head bolts after the fact in order to bolt on the braket....


    Once all of the bolts are hand tight, they need to be tightened in a specific sequence must the tightened in the proper sequence and torqued to specifications. This ensures a tight leak-free seal, and maintains even pressure around the head. For this you’ll need a torque wrench for the initial tightening, and a good breaker bar to tighten the bolts through degrees.
    Set your torque wrench to 40Nm, or in old money, 29.5 ft/lbs, and using the sequence shown below, tighten all of the cylinder head bolts to 40 Nm.


    Now that the bolts are tightened by torque, they need to be further tightened through degrees of rotation. Essentially this means fitting a degree plate to the breaker bar to indicate how many degrees it has been rotated through. I didn’t have one, so I printed up a 360 degree arc, and glued it to some 3mm MDF. It’s more than accurate enough for this job.


    Set up a pointer with a piece of wire so that you can read the degrees of rotation of the degree plate, and starting with the number 1 cylinder head bolt, tighten the cylinder head bolts a further 60°, and go through the same sequence as earlier.
    Next, go through the sequence again, and tighten each bolt a further 60°.

    Finally, tighten bolts numbers 1, 2, 7, 8, 9, 10, 15, 16, 17 and 18 a further 20°, in that order.


    Now that the head is on, it’s time to bolt back on all the bits that you unbolted earlier. Go round the block and bolt back all the little things – clips for the breathers, and a few cable stays in my case.

    Next, bolt the coolant outlet elbow, to the thermostat housing, and fit the coolant hoses.


    Inlet and exhaust manifold now – check page 1 for detailed instructions


    Injector array and new glow plugs are next, plus all associated pipework.


    Next, it’s time to reassemble the rocker shaft assembly. First, replace the 8 pushrods, lubricating them first, and making sure they are correctly located in the cam followers. Then replace the valve caps. A dob of grease on the top of each valve stem will keep them in place.


    Position the rocker shaft to cylinder head, fit but do not tighten the three nuts and two bolts.


    Locate each push rod in turn beneath its respective tappet adjusting screw and tighten each screw until the ball end locates in the recess of the push rod.


    Working from the centre outwards, progressively tighten the three nuts and two bolts to 5 Nm.


    In order for the engine to fire correctly, the tappets need to be adjusted. In simple terms this means setting the gap between the rocker arms and the valve caps to a specified value – in this case, 0.2mm. Not enough clearance results in extra wear, too much clearance results in lost performance and a noisy engine.
    In order to open and close the valves, and thus set the gap between them, you need to rotate the crankshaft, usually by means of turning the crankshaft pulley until the required valve opens. This requires a fair bit of effort, particularly when working on your own, and there is an easier way.
    Chock the right side tyres and jack up the front left tyre off the ground. Select high 5th gear, and turn the wheel with your foot while leaning over the engine and watching for the valves to open and shut
    Anyhow, rotate the crankshaft pulley, or the wheel, until number 8 valve ( counting from front of engine ) is fully open.


    Using feeler gauges and a screwdriver, adjust the clearance of number 1 valve to 0.20 mm. The tappets should not be set with the feeler gauge nipped, the tappet should be set to nip and then backed to the point that the feeler gauge starts to be a sliding fit. The easiest way to set is undo the lock nut with a ring spanner, leave spanner on lock nut an adjust tappet with screwdriver in one hand whilst sliding the feeler gauge until you have correct setting as above, then let go of feeler gauge and whilst holding the tappet steady with the screw driver (not allowing it to turn), tighten the lock nut back up, then check that it is still a nice fit on the feeler gauge.


    Adjusting the tappets follows the 'Rule of 9'. i.e. When valve number 2 is down, adjust the tappet on valve number 7. Therefore the remaining valve clearances are adjusted in the following sequence:
    Adjust number 3 clearance with number 6 valve fully open
    Adjust number 5 clearance with number 4 valve fully open
    Adjust number 2 clearance with number 7 valve fully open
    Adjust number 8 clearance with number 1 valve fully open
    Adjust number 6 clearance with number 3 valve fully open
    Adjust number 4 clearance with number 5 valve fully open
    Adjust number 7 clearance with number 2 valve fully open
    Upon completion, re-check all clearances and adjust as necessary.

    Finally, the rocker cover is replaced. Clean the mating faces of rocker cover and cylinder head, position the rocker cover on the cylinder head, fit the three flange nuts and working from the centre outwards, tighten to 10 Nm.


    Lubricate the ’O’ ring with engine oil and refit the crankcase breather cyclone unit to the rocker cover.
    Reconnect the breather hoses to cyclone unit, rocker cover and cylinder block.


    Refill the engine (and the mechanic) with the necessary fluids


    Now for the moment of truth. I had a couple of “oh ****” moments where the engine wouldn’t turn over, before I found the loose connection to the starter, and once fixed, once fuel was pumped through to the injectors, it fired up straight away! Have to say that I’m pretty happy with the job, and I’d recommend anyone to give it a shot. The engine sounds a little different – not worse, just different. The tappet adjustments sound fine, so now it’s time to run it in, and see how it fares out.
    Now that this little setback has been worked around, it’s on to the next job.

  4. #44
    Join Date
    Jan 2009
    Location
    On the road around Australia
    Posts
    900
    Total Downloaded
    0
    Not much to report since the head gasket has been done. I've run it in over the past few days and everything seems to be fine, and she's running well. One of the tappets may need a little more fine tuning, but other than that, a good result.

    Dropped into Clarke Rubber on the way home, and picked up a sheet of dense foam to insulate the cab. Why am I insulating it? Well I'll have the facility to sleep in the back if the weather/location doesn't facilitate the use of the roof tent, and I've spent my share of nights in countries that are far too hot or cold. In addition, the Landy ain't the quietest of beasts, and it's nice to be able to hold a conversation or listen to the radio without getting drowned out by the engine.


    Tools of the trade - Contact adhesive and a small roller:


    Just a couple of shots of the rear panels done:


    It's getting too dark now, and I have spent waaaaay too much time breathing in fumes from the contact adhesive, so the rest can wait till tomorrow When I was cleaning up though, I came across a roll of sisalation left over from a building project, which I'm considering layering over the foam to reduce heat transfer into the vehicle.

  5. #45
    Join Date
    Jan 2009
    Location
    On the road around Australia
    Posts
    900
    Total Downloaded
    0
    Finished off insulating the shell yesterday. For anyone thinking of doing the same, it takes exactly a sheet and a half of foam rubber to insulate the roof and sides of a 110. Here's a few pics, for anyone interested...


    I've decided not to reuse the original headliner for a couple of reasons. The first being it looks like it's made from papier-mâché, and the second is that the indentations in the panels don't leave much room for insulation. So I'm going to sheet off the roof in 3mm MDF - lightweight, cheap, and much more robust (and easy to break - you can see the sheet in the background that I folded earlier )


    To get the sheet to take the form of the roof, wet down the sides that will be curved, and jack it into position in the roof itself. Left in this position for a few hours, the wet fibres will take the form of the roof. For now the panel is only temporarily in place - I won't make it permanent until I have all of the additional wiring run under the roof.


  6. #46
    Join Date
    Jan 2009
    Location
    On the road around Australia
    Posts
    900
    Total Downloaded
    0
    Well, another somewhat unproductive day, due in no small part to the fact that the temperatures were reaching nosebleed levels, and that I am still waiting for a few deliveries to arrive. But did get around to a few things.

    Began upgrading the fuel system to a dual tank, SVO system. I've been running the Defender for the past year on a vegetable oil/diesel blend, and with the exception of a few hiccups at the start, it's been running perfectly, cheaply, and cleanly. The head gasket change showed clean injectors and clean piston heads, so I'm switching to a dual tank system - two tanks, two fuel filters, two changeover valves and two returns. I'll go into more details later when everything is good to go.

    I'm replacing the stock filter with a CAV equivalent, and adding a second CAV filter for SVO. This means that I only have to carry one type of filter, they are far cheaper, and more easily available no matter where I end up.


    One of the heat exchangers for the SVO/WVO


    Bent up and welded the frame for the rear roof rack and ladder. The ladder is pretty solid, but I figure I'll be using it a fair bit, so...


    The ladder will be side mounted, and takes the profile of the vehicle. I'll cut it off when the roofrack is in place, and I know the final position of things.


    And what took up an inordinate amount of time - making mounting brackets and such for fiddly little things...


    Nothing too exciting, but it's getting there.. slowly

  7. #47
    midal Guest
    Very informative thread Mike.....you're sure getting stuck into things. A pleasure to watch the progress.

    Cheers
    Mick

  8. #48
    Join Date
    Aug 2007
    Location
    gold coast
    Posts
    626
    Total Downloaded
    0
    I am enjoying the thread, interesting to see how it all goes together.

  9. #49
    Join Date
    Jan 2009
    Location
    On the road around Australia
    Posts
    900
    Total Downloaded
    0
    Had to work for a while today, so didn't get too much done. Did pick up the fixtures and fittings for the fuel system though - $150 worth of brass fittings...

    But despite appearances, it is coming together...


    Started marking out the overhead console. 6mm ply should give it the rigidity that I'm looking for, without it being heavy,


    I've cut the new roof panels to size, and am using the Defender roof itself as a former for the curves. The panels are 3mm MDF, wetting them down, then lining them up and slowly jacking them into position over the course of a few hours ensures that they don't split. They amost follow the curve of the roof perfectly now - after a few more days they'll have taken that form permanently, and I can line the sheets with marine carpet then.


    I'm looking for a few opinions on this one. Seeing as the two sliding windows are one of the weakest points security wise, I'm toying with the idea of putting some security mesh in the back windows. While this will never stop anyone determined enough to get in, it does deter the opportunist, and it means I can leave a window open at night while sleeping, without some light fingered git helping himself, or while in slow traffic, etc.

    My options are wither mesh on the outside, or mesh on the inside. Mesh on the inside is far easier to install, it can't actually be grabbed in order to rip it off. However, it does make it difficult to open windows and such. Mesh on the outside solves that problem, but it's not as easy to fit - I'll have to make up a frame for it, and I risk my Defender resembling a riot squad van

    Any suggestions? Should I even bother at all?


  10. #50
    Join Date
    Apr 2007
    Location
    Alice Springs NT
    Posts
    286
    Total Downloaded
    0
    Great threasd Mike!!!

    But don't skimp on the details of the trip itself. It sounds phenominal.

    Which route are you planning to take? How long do you anticipate the journey will take you? Are you going to try and get sponsorship and document the trip with a webpage?

    Info, info, info.

    Love the truck build though

    Jason

Page 5 of 23 FirstFirst ... 3456715 ... LastLast

Bookmarks

Bookmarks

Posting Permissions

  • You may not post new threads
  • You may not post replies
  • You may not post attachments
  • You may not edit your posts
  •  
Search AULRO.com ONLY!
Search All the Web!