Page 34 of 69 FirstFirst ... 24323334353644 ... LastLast
Results 331 to 340 of 690

Thread: Meet my 90, and share the adventure.

  1. #331
    Tombie Guest
    Quote Originally Posted by carlschmid2002 View Post
    That's interesting because all of our new ADE (Aerial Delivery Equipment) is made out of it. Cargo nets etc and it gets bent over all sorts of surfaces. Helicopter longline load lifting equipment


    Interesting... Thanks for the link...

    Looked from the limited data that they have anti-abrasion pads recommended for certain surfaces etc...

    It's strength likely comes from the load sharing construction..

  2. #332
    Join Date
    May 2014
    Location
    Armidale, NSW
    Posts
    70
    Total Downloaded
    0
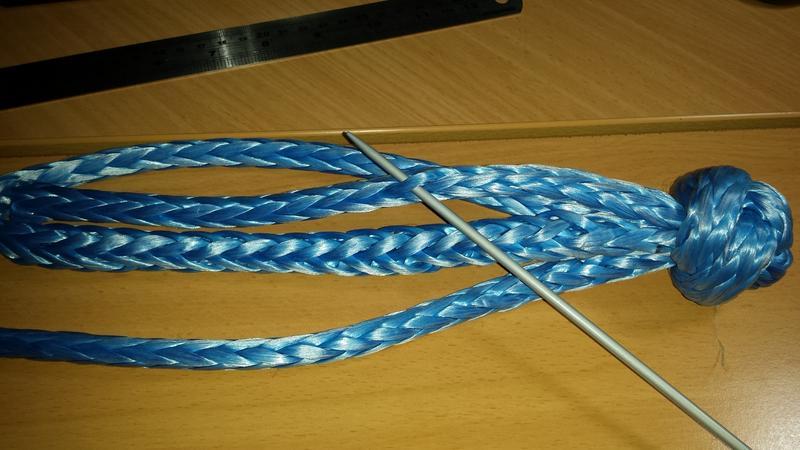
    There are also some commercial available ones on the market which are rated. - Gator Jaw - Soft Shackle - Snake Racing However it appears they are out of another type of rope - Plasma rope. This seems to be a competitor to Dyneema

    For those wanting a long read - this is an article on the technical differences between the two -http://www.plasmarope.com.au/plasma-vs-dyneema.html

  3. #333
    Join Date
    May 2014
    Location
    Armidale, NSW
    Posts
    70
    Total Downloaded
    0
    There is also an older thread http://www.aulro.com/afvb/recovery/1...-shackles.html on this topic that has some links and discussion on ratings.

  4. #334
    Join Date
    May 2014
    Location
    Tamworth NSW
    Posts
    4,295
    Total Downloaded
    0

    The Making of the soft shackle

    I bought 5metres of 10mm diameter, 12 strand dyneema off ebay. Total cost about 35 clams.
    Cut to 2m length:


    Fold in half to find your centre, then calculate the size of the loop you want to splice into the end. This is recommended to be approx diameter of 2 strands of the rope. Mark where the rope needs to be spliced thru the other rope, and make a hole with a fid. I used a combination of a knitting needle from the missus' sewing kit, and a taper punch from the man-cave.


    Tie the button knot. BAM!


    I tensioned the knot with the knitting needle fid, and the taper punch, working the knot around until it was tight.
    Extra tension was put on the knot with the jack:


    With the two 'legs' of the knot, you need to taper the dyneema, and then feed it inside the main section of the loop. This acts like a chinese finger trap, and keeps the loose end contained, and adds to the strength of the whole arrangement. Here is a pic of picking out a strand to cut it, and taper it down.


    I've made 3 so far. 2 out of 10mm dyneema, and a small one out of 2mm dyneema.
    The first one took about 2 hours to do, but this was while following a few different online instructions and taking my time, scratching my head when tying the knot etc. The second one was much quicker at about an hour. I reckon with some practice I'd get one out every half hour.

    This soft shackle design is a more resource hungry design, using a lot of rope, and using some funky and time consuming knots and splicing, but has a great level of strength over other designs.

    Overall, for a modest price and a few hours work, not a bad result.

    Stay tuned for some testing / recovery work using them in the future!
    Attached Images Attached Images
    -Mitch
    'El Burro' 2012 Defender 90.

  5. #335
    cuppabillytea's Avatar
    cuppabillytea is offline Loud Mouthed Rat Bag Gold Subscriber
    Join Date
    Apr 2015
    Location
    Lillyfield NSW
    Posts
    7,824
    Total Downloaded
    0
    It would be good for everyone to have a good read of these articles.
    These fibres are becoming more and more common in the Maritime world.
    For Mooring lines, which are paid out, sleeved at the Fair Lead, loaded and set, the favourite seems to be Dyneema.
    For Tug lines, which are fed to the Ship through often gnarly, rusty Fair Leads. The favourite is Plasma. These lines are made up as Strops and attached to heavy winch lines with a Cow Hitch, then the sides of the Strop are whipped together at intervals along its length (about 10-15 Meters). They cop a fair old flogging and are sacrificial. They serve a set number of tows and are then discarded.
    Plasma and Dyneema, although essentially the same material, are manufactured in entirely different ways which gives them different properties. So it's good to read as much as you can before you decide which will be the one which best suits your needs.
    Cheers, Billy.
    Keeping it simple is complicated.

  6. #336
    Join Date
    May 2014
    Location
    Tamworth NSW
    Posts
    4,295
    Total Downloaded
    0

    Testing for tyre sizing

    So this is the ghetto way of seeing what tyres will fit.
    I asked the masses about tyre fitment here, but results were inconclusive.
    One thing about being a web-wheeler is you often spend more time looking for answers online than it would take to actually get out there and suss it out yourself.
    So I flexed it up as best I could within a 10min drive from home, and came up with this. For science.


    The bent track rod debacle caused quite a lot of tyre wear before I noticed it. As a result, the Goodyear wrangler MT's in 235/85/R16 are below the Tread Wear Indicators on the inside edges. They are approx 35,000km old. So new rubber is on the cards.

    I ideally want to run a larger diameter wheel for additional clearance to the diff. I've pretty muich settled on a 255/85/R16, which is a 33"x10" wide wheel in the old money. This is not a common size, but will be a good tyre until any lift or more serious suspension mods are done. All being said, these will be 20mm wider than the stock rubber, and about 40mm or so larger diameter. Divide this by 2 and you get the additional clearnace requirements for around the tyre and in the wheel well.

    If anything, this serves as a good chance to showcase the look of the car as it stands, as I've noticed I'm not one to take full car shots that often.
    Bonus points to the person that spots the most recent battle scar on the vehicle!
    -Mitch
    'El Burro' 2012 Defender 90.

  7. #337
    Join Date
    Apr 2012
    Location
    Orange, NSW
    Posts
    7,965
    Total Downloaded
    0
    Mudflap?
    Scraped something on the passenger side of the bullbar?

    Sent from my HTC One using AULRO mobile app
    The Phantom - Oslo Blue 2001 Td5 SE.
    Half dead but will live again!

    Nina - Chawton White 2003 Td5 S
    Slowly being improved

    Quote Originally Posted by Judo View Post
    You worry me sometimes Muppet!!


  8. #338
    Join Date
    May 2014
    Location
    Tamworth NSW
    Posts
    4,295
    Total Downloaded
    0
    Quote Originally Posted by Disco Muppet View Post
    Mudflap?
    BINGO! You get the prize!
    It didn't last too long. Came off up in the forest a while back. Must have got snagged on something and got plucked off.
    Mud flap death count is 3 now.
    -Mitch
    'El Burro' 2012 Defender 90.

  9. #339
    Join Date
    May 2014
    Location
    Tamworth NSW
    Posts
    4,295
    Total Downloaded
    0
    Took a picture today.


    Attached Images Attached Images
    -Mitch
    'El Burro' 2012 Defender 90.

  10. #340
    Join Date
    May 2014
    Location
    Tamworth NSW
    Posts
    4,295
    Total Downloaded
    0

    More small side-projects

    One of the first 'bolt-on' mods I did to the defender was an Air compressor, back in August 2014. I never really documented the install, as it sort of slotted into a hiatus I had in this thread towards the start of my ownership. I glossed over it in this post, but never really elaborated.. maintly because the shabby wiring job I did to get it working would make a finger painting by Michael J fox look good in comparison.

    I mounted an ARB CKMTA12 compressor on the passenger side rear guard, beside the rarely used rear seat. It's easy to get the air hose connected thru the rear window, or from behind the passenger seat as needed, and is fairly central to all the wheels on the vehicle so hose length can be kept to a minimum (I can get the 6m hose out the passenger door, and stretch around the car to the rear driver's side wheel without too much drama).
    Looks like this:


    One thing that bothered me about this compressor was the ARB supplied tyre inflator air chuck. It's a pain to have to push on the air chuck and wait around kneeling in the mud to pump the tyres up... even with a relatively fast air compressor. Then the problem of having to use a second pressure gauge to check the pressure, and rinse and repeat on all 4 corners until the right pressures are had.
    So I picked up a Jamec Pem tyre inflator for the task. Looks like this but with a longer hose so I can clip it on, and be a comfortable distance from the schrader valve while inflating.


    It has an integral pressure gauge that lets me know what pressure the tyre is at, and also allows tyre deflation with a half-press of the trigger. Winning. I did, admittedly, need to change the quick release coupling on the back of the inflator to with with the ARB air hose I have. FYI ARB 'american industrial standard' quick release coupling is the same as is used with Bostich brad nail guns. So any nail gun shop should have a good supply of (IIRC) 1/4NPT air fittings to suit adapting any air inflator to an ARB hose.

    I'm no old fart, but even still, the gauge that was on this inflator is absolute crap to read. Whoever decided that a tyre inflator should have a 50mm diameter pressure gauge with a scale of 170psi is dumb. Each little graduation about 0.5mm apart on the gauge was 2psi. Makes inflating a tyre even in good lighting a guessing game, at best. Just because a compressor can go to 170psi, doesn't mean it's a usable scale for inflating tyres. So after putting up with the gauge for about 18months, the hunt begun for a beter gauge.

    After some searching I found a Wika gauge, p/n 111.10.050 which will do the trick. Only a 6 week backorder at blackwoods! How awesome is that!
    The gauge is a direct replacement 50mm gauge with a scale of -30 to 70psi- MUCH better for tyre inflation. Admittedly I might have messed up with the negative scale of the gauge, but I can't justify another 6 week wait again...


    The new gauge fits in the factory rubber dongle cover that came with the inflator, and the hose is re-secured with an EFI hose clamp. I'd love to use the Oetiker style (double ear) clamps that were originally used with it, but I don't have the tooling or the clamps to use. So far it's been rather useful, and makes the inflator much more user friendly.
    -Mitch
    'El Burro' 2012 Defender 90.

Page 34 of 69 FirstFirst ... 24323334353644 ... LastLast

Bookmarks

Bookmarks

Posting Permissions

  • You may not post new threads
  • You may not post replies
  • You may not post attachments
  • You may not edit your posts
  •  
Search AULRO.com ONLY!
Search All the Web!